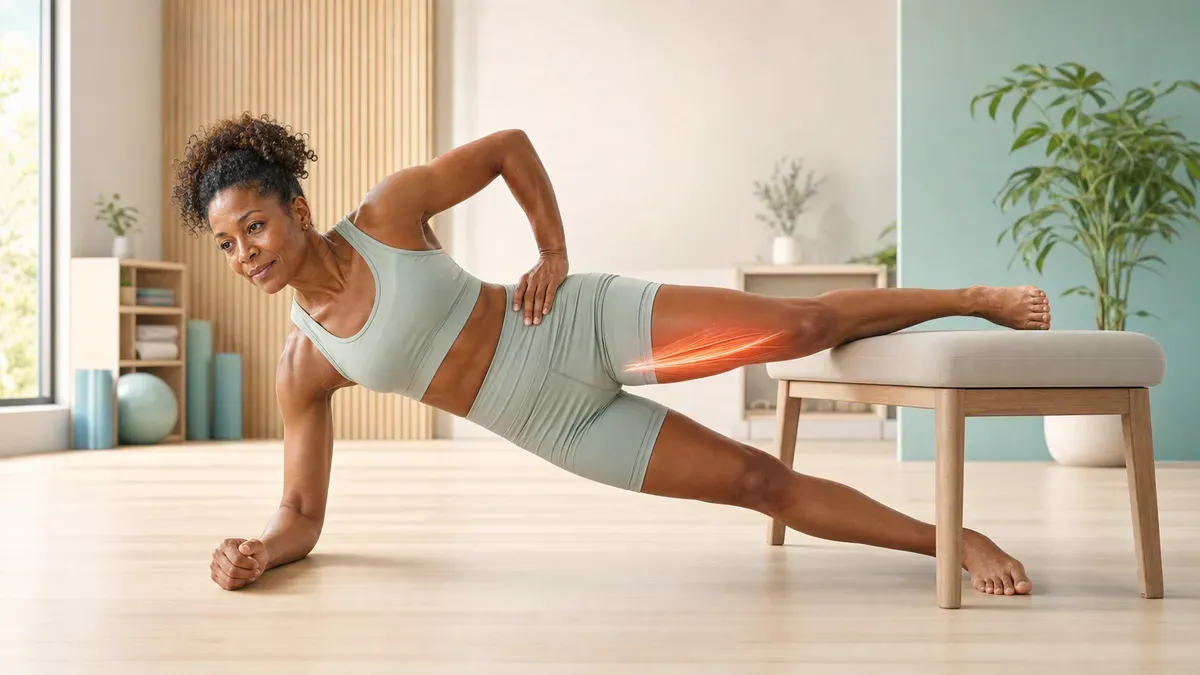
Adductor exercises: six progressions for inner-thigh strength
Learn six adductor exercises for inner-thigh strength, hip stability, and groin resilience, with technique cues, progressions, and clear pain-safe limits.
Quick answer
The best adductor exercises progress from supported squeezes and side-lying raises to standing adduction, lateral lunges, slider adduction, and the Copenhagen plank. Train two or three pain-free movements twice per week, control both the lifting and lowering phases, and increase range or resistance only after your pelvis and knee remain stable.
The goal is not simply to make the inner thigh feel tired. Useful adductor training builds force across different hip positions, prepares the groin for side-to-side movement, and fits into a balanced lower-body program. Start with the easiest variation you can perform without pinching, sharp pain, or compensation.
Key facts
- Hip adductors pull the thigh toward the midline and stabilize the pelvis during movement.
- Progressive resistance increases the force that adductor muscles can produce.
- Copenhagen adduction trains high eccentric and isometric adductor force.
- Lateral exercises connect inner-thigh strength to cutting, stepping, and balance.
- Persistent groin pain requires assessment because several tissues can produce similar symptoms.
What are the adductor muscles?
The hip adductors occupy most of the medial, or inner, thigh. The group usually includes the adductor longus, adductor brevis, adductor magnus, gracilis, and pectineus. Most attach the pelvis to the femur; the gracilis crosses the knee and attaches to the upper tibia.
Their shared name describes only one action: bringing the thigh toward the body’s midline. In real movement they do more. Depending on hip angle and which fibers are active, the group can help flex or extend the hip, rotate the femur, control the leg as it moves outward, and steady the pelvis during walking. The adductor magnus is especially large and has regions with different mechanical roles (StatPearls, 2026).
This is why squeezing a ball is useful but incomplete. A complete program exposes the adductors to:
- Shortened force, as in an adductor squeeze
- Longer-muscle control, as in a lateral lunge or slider
- Single-leg stability, as in standing band adduction
- High-tension eccentric work, as in a Copenhagen progression
- Coordination with the trunk, glutes, and opposite leg
The adductors are neither isolated “toning” muscles nor the opposite of the glutes in every task. Movement depends on shifting roles among muscle groups. Our guide to agonist and antagonist muscles explains why the same muscle can produce motion in one phase and control it in another.
What adductor training can and cannot do
Direct adductor exercises can improve inner-thigh strength and the ability to tolerate lateral force. That matters in football, hockey, tennis, martial arts, skiing, running over uneven ground, and everyday tasks such as stepping sideways or catching your balance.
The strongest prevention evidence comes from football. In a cluster-randomized trial of 652 male semiprofessional players, a progressive adductor program was associated with a 41% lower risk of reporting groin problems than usual training. The program used one exercise with three progression levels, three times weekly in preseason and once weekly during the season (Harøy et al., 2019).
That result does not mean one exercise prevents every groin injury, nor does it prove the same effect in all ages, sports, or people with current pain. The adductor evidence base is weighted toward young football players. A 2021 systematic review found consistent strength and muscle-activation gains from the Copenhagen exercise, but it also concluded that more research was needed to define the direct injury-prevention relationship across populations (Schaber et al., 2021).
Adductor training also cannot selectively remove fat from the inner thigh. Fat loss is systemic, while resistance exercise changes muscle force, skill, and potentially muscle size. Use these exercises to build capacity, not to promise spot reduction or a particular leg shape.
Six adductor exercises from beginner to advanced
The exercises below are arranged by coordination and loading demand, not by an absolute ranking. You do not need all six in one session. Choose one lower-demand drill and one movement that challenges the adductors in a longer or more functional position.
| Exercise | Main training effect | Useful starting dose | Relative difficulty |
|---|---|---|---|
| Supine adductor squeeze | Isometric force and body awareness | 2 sets of 6–8 holds | Beginner |
| Side-lying hip adduction | Isolated full-range control | 2 sets of 8–12 per side | Beginner |
| Standing band adduction | Pelvic and single-leg stability | 2 sets of 8–12 per side | Beginner to intermediate |
| Lateral lunge | Loaded length and frontal-plane control | 2–3 sets of 6–10 per side | Intermediate |
| Slider adduction | Controlled eccentric loading | 2 sets of 6–10 per side | Intermediate |
| Copenhagen adduction | High adductor and trunk demand | 2 sets of 5–10 per side | Intermediate to advanced |
1. Supine adductor squeeze
Lie on your back with knees bent and feet flat. Place a folded towel, small ball, or firm cushion between the knees. Gently brace, exhale, and squeeze the object without lifting the feet or twisting the pelvis.
Hold for 5–10 seconds, then release slowly. Start around a moderate effort rather than a maximal crush.
Technique cues:
- Keep pressure equal through both legs.
- Do not hold your breath.
- Keep the low back and pelvis quiet.
- Stop if the squeeze reproduces sharp or increasing groin pain.
The squeeze is easy to scale and useful for learning to feel the adductors. It is less specific to long-muscle control, cutting, or high-force sport, so treat it as an entry point or warm-up rather than the whole program.
2. Side-lying hip adduction
Lie on one side. Bend the top leg and place its foot on the floor in front of the lower thigh. Keep the bottom leg straight. Lift the bottom heel several inches while keeping the kneecap facing forward, pause, and lower for two or three seconds.
Technique cues:
- Stack the ribs and pelvis instead of rolling backward.
- Lead with the inner thigh, not a swing of the foot.
- Use a smaller lift if the pelvis starts moving.
- Add a light ankle weight only after 12 controlled repetitions feel easy.
This variation trains the lower leg independently and makes left-right differences obvious. It can be helpful before standing work because balance does not limit the target muscle.
3. Standing band adduction
Anchor a resistance band beside you at ankle height and attach it to the near ankle. Stand tall on the other leg with support from a wall or rack. Begin with the working leg slightly out to the side, then draw it across toward the midline. Return slowly without letting the band pull the pelvis sideways.
Technique cues:
- Use fingertip support so balance does not hide adductor fatigue.
- Keep the stance knee soft and aligned over the foot.
- Move from the hip while the trunk remains upright.
- Control the outward return for two or three seconds.
Standing adduction combines hip force with pelvic control. It is a useful bridge between floor exercises and faster lateral activity.
4. Lateral lunge
Stand with feet together. Step wide to one side, sit the hips back over the stepping leg, and keep the other leg long with its foot planted. Push the floor away to return to standing.
The adductors of the straighter leg lengthen under load, while the stepping leg shares work among the hip and knee muscles. Begin with bodyweight and a comfortable range.
Technique cues:
- Keep the stepping knee tracking in the same direction as the toes.
- Maintain a tripod foot: heel, base of the big toe, and base of the little toe.
- Stop the descent before the pelvis tucks or the groin feels pinched.
- Add a front-held dumbbell only after both sides look and feel controlled.
A lateral lunge trains strength and mobility together. If range of motion is the limiting factor, use the principles in our flexibility versus mobility guide instead of forcing a deeper position.
5. Slider adduction
Stand with one foot on a furniture slider or towel on a smooth floor. Keep most of your weight over the stationary leg. Slowly slide the other foot outward as the stance knee and hip bend, then pull the sliding leg back underneath you.
Use a rail or sturdy support. The return should come from pressing the sliding foot into the floor and drawing it inward, not from bouncing off the stance leg.
Technique cues:
- Start with a short slide and three-second lowering phase.
- Keep both feet pointing mostly forward.
- Do not let the pelvis rotate toward the moving leg.
- Reduce range before adding load.
The slider creates an accessible eccentric challenge because the adductors control the leg as it moves away from the body. It also teaches force in a position that resembles side stepping and changes of direction.
6. Copenhagen adduction
The Copenhagen variation adds substantial inner-thigh demand to a side-support pattern. Learn standard side plank form and shoulder-aware progressions first if the supporting arm or trunk position is not yet comfortable.
Lie on your side with the top leg supported on a bench and the bottom leg underneath it. In the short-lever version, support the top knee. Brace the trunk, press the supported leg down, and lift the pelvis so the body forms a straight line from shoulder to knee. The lower leg can assist by touching the floor.
Progress to straight-leg support only after the short-lever version is controlled. In the long-lever version, the top ankle rests on the bench and the lower leg rises toward it as the pelvis stays elevated.
Technique cues:
- Begin with the knee-supported variation.
- Keep the shoulder, ribs, pelvis, and supported knee aligned.
- Avoid hanging through the groin or twisting the chest toward the floor.
- Lower under control and stop well before form breaks.
- Use a padded, stable bench that cannot slide.
The Copenhagen exercise produces high adductor longus activation. An EMG study of eight common hip-adduction exercises recorded a wide range of activation—from 14% to 108% of a maximal voluntary contraction—showing that exercise selection changes demand substantially (Serner et al., 2014).
In an eight-week randomized trial, a progressive Copenhagen program increased eccentric hip-adduction strength by 35.7% in young male football players, while the usual-training control group did not improve (Ishøi et al., 2016). Another trial found that adding Copenhagen adduction to a structured warm-up produced an 8.9% greater increase in eccentric adductor strength than the standard warm-up (Harøy et al., 2017).
These results support progression, not jumping straight to the hardest lever. A 2025 trial in female football players found that both lower- and higher-volume eight-week programs increased isometric adductor strength, with no clear advantage for the higher volume. Both groups maintained strength during a once-weekly maintenance phase (Thorarinsdottir et al., 2025).
A six-week adductor progression
This template is for a healthy adult who is new to direct adductor training. It is not rehabilitation for an acute strain. Perform the work after a general warm-up and before high-fatigue conditioning.
| Weeks | Session A | Session B | Progress rule |
|---|---|---|---|
| 1–2 | Squeeze 2 × 6 holds; side-lying raise 2 × 8 | Squeeze 2 × 6 holds; supported lateral lunge 2 × 6 | Finish with 3–4 good repetitions in reserve |
| 3–4 | Standing band adduction 2 × 10; lateral lunge 2 × 8 | Side-lying raise 2 × 12; short-lever Copenhagen 2 × 5 | Add range before resistance |
| 5–6 | Slider adduction 2 × 8; short-lever Copenhagen 2 × 8 | Lateral lunge 3 × 8; standing band adduction 2 × 12 | Add a set or small load, not both |
Rest about 60–120 seconds between demanding sets. A short squeeze may need less rest; a hard Copenhagen set may need more. The final repetition should look like the first even if it feels slower.
For general health, adductor work belongs inside a full routine rather than replacing it. The World Health Organization recommends muscle-strengthening activity involving major muscle groups on at least two days per week for adults, alongside aerobic activity (WHO guidelines). Our exercise and longevity guide shows how targeted work fits with the larger weekly mix.
How to choose the right difficulty
Use three filters:
- Pain: the movement is comfortable or produces only mild, stable effort.
- Control: the pelvis, knee, and trunk stay aligned through the chosen range.
- Recovery: soreness does not alter walking or the next planned session.
Progress only when all three are present. Make one variable harder at a time:
- Increase the hold from 5 to 10 seconds.
- Add two repetitions per set.
- Expand the range slightly.
- Move the support farther from the hip.
- Add a light band, ankle weight, dumbbell, or cable.
- Add one set.
You do not need maximal soreness. Especially after a new eccentric exercise, the adductors can become sore enough to change gait. Leave at least 48 hours before the next hard adductor session while learning your response. The recovery-between-workouts guide can help distinguish normal training fatigue from a pattern that needs more recovery.
How adductors fit into a balanced lower-body session
A simple session can use one compound movement, one direct adductor exercise, and one complementary hip exercise:
- Squat, Bulgarian split squat, or step-up: 2–4 sets
- Lateral lunge or slider adduction: 2–3 sets
- Short-lever Copenhagen or standing band adduction: 2 sets
- Hip abduction or single-leg balance exercise: 2–3 sets
Train both sides. If one side is weaker, start there and match the completed range, load, and repetitions on the stronger side. Do not automatically double the work on the weaker side; large volume jumps can irritate the very tissue you are trying to strengthen.
Adductors contribute to pelvic control, but they are not a universal cure for uneven walking. If gait asymmetry is your main concern, combine strength work with an assessment of pain, mobility, balance, and movement habits. Our walking asymmetry guide covers that broader decision.
If the goblet squat is your compound movement, use our goblet squat form guide to choose a stable stance, controllable depth, and sensible progression.
How SuperAge can track the training context
Adductor strength is not a standard wearable metric. You can still track the context around a new strength block: completed workouts, walking volume, sleep, resting heart rate, HRV trends, and whether soreness changes normal activity.
Use those signals to answer practical questions:
- Did your weekly activity fall because soreness affected walking?
- Are hard lower-body sessions clustering without enough recovery?
- Is a strength progression improving consistency rather than disrupting it?
- Are sleep and recovery trends stable as you add load?
SuperAge can organize health and activity trends from Apple Health in one view. It cannot diagnose groin pain or tell you that a painful exercise is safe. Pair data with movement quality and symptoms, and use a qualified clinician when pain persists.
Download SuperAge to follow training and recovery trends while you build a repeatable strength routine.
When inner-thigh or groin pain needs assessment
“Groin pain” is a location, not one diagnosis. An international consensus classifies athletic groin pain into adductor-related, iliopsoas-related, inguinal-related, pubic-related, hip-related, and other causes. Adductor-related pain is typically identified through adductor tenderness plus pain with resisted adduction, but a clinical examination is needed to distinguish overlapping problems (Doha agreement, 2015).
Stop the exercise and seek appropriate assessment when you have:
- A sudden pop, sharp pain, bruising, or swelling
- Pain that makes you limp or prevents normal weight bearing
- Deep groin pinching with hip rotation or flexion
- Pain with coughing, sneezing, or a new groin bulge
- Numbness, weakness, fever, or unexplained night pain
- Symptoms that worsen across sessions or do not improve with reduced load
Do not stretch aggressively into acute groin pain. Do not use painkillers to pass a workout test. If you are returning from an adductor strain, follow an individualized rehabilitation and return-to-sport plan rather than the generic six-week template above.
Common adductor-training mistakes
Treating every sensation as useful stretching
A broad muscular stretch may be acceptable; a sharp pinch at the hip or pubic area is not a flexibility target. Shorten the range and reassess.
Starting with the long-lever Copenhagen
Moving support from the knee to the ankle substantially increases the lever arm. Earn the harder variation through stable short-lever sets.
Chasing range before pelvic control
A deeper lateral lunge is not better when the foot collapses, the knee turns inward, or the pelvis rotates. Build usable range, not a pose.
Training only the inner thigh
The hip needs coordinated adduction, abduction, extension, flexion, and rotation. Include gluteal, trunk, calf, and general leg strength.
Adding too much eccentric volume
Slider and Copenhagen variations can create delayed soreness. Add repetitions, range, load, or sets one at a time.
Ignoring sport-specific speed
Slow strength builds capacity but does not fully reproduce sprinting, skating, or cutting. Athletes should progress from strength to supervised acceleration and change-of-direction work before returning to full sport. The progression in our short track speed skating guide shows why inner-thigh strength must still be converted into coached edge control and safe pack skills.
Our comparison of speed skating disciplines also shows how turn radius, surface, and race format change the way lateral strength is expressed.
Frequently asked questions
What is the best exercise for the inner thighs?
There is no single best exercise for every goal. A side-lying raise or standing band adduction is accessible for beginners; a lateral lunge trains the adductors in a longer position; a Copenhagen progression creates high force. Combine two patterns you can perform without pain.
Are squats enough to train the adductors?
Squats involve the adductors, especially the adductor magnus, but they do not always provide enough direct adduction or lateral control for a specific strength goal. Add one direct exercise when groin resilience, side-to-side sport, or a measured weakness is the priority.
How often should I train adductors?
Twice per week is a practical starting point for general strength. Athletes sometimes use a higher preseason frequency and once-weekly maintenance, but the correct dose depends on sport load, experience, symptoms, and the difficulty of the exercise.
Is the Copenhagen plank safe for beginners?
The long-lever version is usually too demanding as a first adductor exercise. Beginners can use a knee-supported short lever, lower-leg assistance, fewer repetitions, and a smaller hip lift. If that cannot be controlled without pain, start with squeezes or side-lying adduction.
Can adductor exercises reduce groin injuries?
Progressive adductor programs reduced groin problems in football trials, including a 41% lower reported risk in one large male semiprofessional cohort. The evidence does not guarantee prevention and is less certain outside football. Warm-up quality, total load, prior injury, speed exposure, and recovery still matter.
Should I stretch tight inner thighs before strengthening?
Use a gentle dynamic warm-up and train through a comfortable range. Static stretching is not required before strength work and should not be forced into pain. If one hip feels persistently restricted or pinched, assessment is more useful than repeatedly stretching harder.
Why do my adductors hurt after lateral lunges?
The straighter leg’s adductors control load while lengthening, which can cause delayed-onset muscle soreness after a new or larger dose. Mild soreness that resolves and does not change walking is common. Sharp pain, bruising, limping, or worsening symptoms are not normal training soreness.
Can I train adductors after age 50?
Yes. Use support for balance, begin with a manageable range, leave several repetitions in reserve, and progress one variable at a time. If you have hip arthritis, prior groin injury, joint replacement, osteoporosis, or persistent pain, ask a clinician to adapt the exercise.
Key takeaways
- Train adductors in more than one position: shortened, lengthened, standing, and lateral.
- Begin with squeezes or side-lying raises before high-leverage Copenhagen work.
- Use two weekly sessions and increase only one loading variable at a time.
- Pair direct adductor work with full lower-body strength, mobility, balance, and recovery.
- Treat sharp, persistent, or function-changing groin pain as a reason to stop and seek assessment.
References
- StatPearls. Anatomy, bony pelvis and lower limb: thigh adductor magnus muscle. Updated 2026.
- Serner A, et al. EMG evaluation of hip adduction exercises for soccer players. British Journal of Sports Medicine. 2014.
- Ishøi L, et al. Large eccentric strength increase using the Copenhagen Adduction exercise in football. Scandinavian Journal of Medicine & Science in Sports. 2016.
- Harøy J, et al. Including the Copenhagen Adduction Exercise in the FIFA 11+. American Journal of Sports Medicine. 2017.
- Harøy J, et al. The Adductor Strengthening Programme prevents groin problems among male football players. British Journal of Sports Medicine. 2019.
- Schaber M, et al. The neuromuscular effects of the Copenhagen adductor exercise. International Journal of Sports Physical Therapy. 2021.
- Thorarinsdottir S, et al. Low- or high-volume adductor strengthening in female football players. Scandinavian Journal of Medicine & Science in Sports. 2025.
- Dæhlin TE, et al. Three-dimensional hip and knee loading during the Copenhagen adductor exercise. Journal of Biomechanics. 2026.
- Weir A, et al. Doha agreement on terminology and definitions in groin pain in athletes. British Journal of Sports Medicine. 2015.
- World Health Organization. Guidelines on physical activity and sedentary behaviour. 2020.
Related Articles

Marathon wall: causes, prevention, and what to do mid-race
Learn what causes the marathon wall, how pacing, training, carbohydrates, heat, and hydration interact, and what to do if your pace suddenly collapses.